Open your Visual studio (i am using Visual studio 2013) .
- File > new > project > visual c#> Asp.net Web Application.
Give name as learning mvc .Then click ok.

We get a project file with model,views and controller .
- Right Click on controllers in solution explorer. Add > controller > MVC 5 controller empty. Give the name as LoginController. Click Add.
using System;
using System.Collections.Generic;
using System.Linq;
using System.Web;
using System.Web.Mvc;

namespace learning__mvc.Controllers
{
    public class LoginController : Controller
    {
        // GET: Login
        public ActionResult Index()
        {
            return View();
        }
    }
}
You will get a LoginController like this.
You need to install Entity Framework .It can installed by right click on your solution Manage NuGet Package Restore >online > Entity Framework> Install.
Now we are going to add our Model class OurDbContext.
- Model > Add> Class> class name as OurDbContext.cs
- Add Using System.Data.Entity namespace in our OurDbContext.cs class.
Cange your OurDbContext.cs class like this
using System;
using System.Collections.Generic;
using System.Linq;
using System.Web;
using System.Data.Entity;

namespace learning__mvc.Models
{
    public class OurDbContext : DbContext
    {
    }
}
Now add another class called UserAccount.cs in the model.
- Add the namespace :-
using System.ComponentModel.DataAnnotations;
- Add C# properties in UserAccount.cs.It will become our constraints in our database table.
- We also adding data validation to our fields.
Change UserAccount.cs like this
using System;
using System.Collections.Generic;
using System.Linq;
using System.Web;
using System.ComponentModel.DataAnnotations;

namespace learning__mvc.Models
{
    public class UserAccount
    {
        [Key]
        public int UserID { get; set; }

        [Required(ErrorMessage = "First name is required")]
        public string FirstName { get; set; }

        [Required(ErrorMessage = "LastName Name is required")]
        public string LastName { get; set; }

        [Required(ErrorMessage = "Email is required")]
        public string Email { get; set; }

        [Required(ErrorMessage = "User Name is required")]
        public string Username { get; set; }

        [Required(ErrorMessage = "Password is required")]
        [DataType(DataType.Password)]
        public string Password { get; set; }

        [Compare("Password", ErrorMessage = "Please Confirm your password")]
        [DataType(DataType.Password)]
        public string ConfirmPassword { get; set; }


    }
}
Add below c# Property in our OurDbContext.cs class.
public DbSet userAccount { get; set; }
In the LoginController.
- Add the namespace :- using learning__mvc.Models.
- Add a http get method in the LoginController .
public ActionResult Register()
{
            return View();
}
It will show a blank registration page.For posting we need another method.
- Post method is show below.
[HttpPost]
        public ActionResult Register(UserAccount Account)
        {

            if(ModelState.IsValid)
            {
                using (OurDbContext db=new OurDbContext())
                {
                    db.userAccount.Add(Account);
                    db.SaveChanges(); //save data to database

                }
                ModelState.Clear();//clear the content of all input controls
                ViewBag.Message =Account.FirstName +' ' + Account.LastName;
            }
            return View();
        }
We also need Get and Post method for Login Page.
  public ActionResult Login()
      {
          return View();
      }
     [HttpPost]
  public ActionResult Login(UserAccount User)
      {
         using(OurDbContext db=new OurDbContext())
         {
             var usr=db.userAccount.Single(u => u.Username==User.Username && u.Password == User.Password);

             if(usr!=null)
             {
                 Session["UserId"]=usr.UserID.ToString();
                 Session["UserName"]=usr.Username.ToString();
                 return RedirectToAction("LoggedIn");


             }
             else
             {
                 ModelState.AddModelError("","username or password is wrong");
             }
         }
         return View();
      }
We now need a Logged method
public ActionResult LoggedIn()
       {
            if(Session["UserId"] !=null)
            {

                return View();
            }
            else
            {
                return RedirectToAction("Login");

            }
       }
So Controller method are finished now we want to create our view’s.
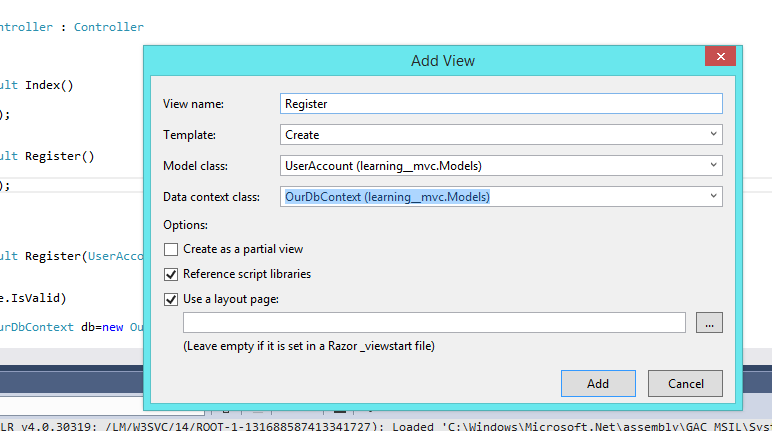
Right click on the Get method of Register and add View
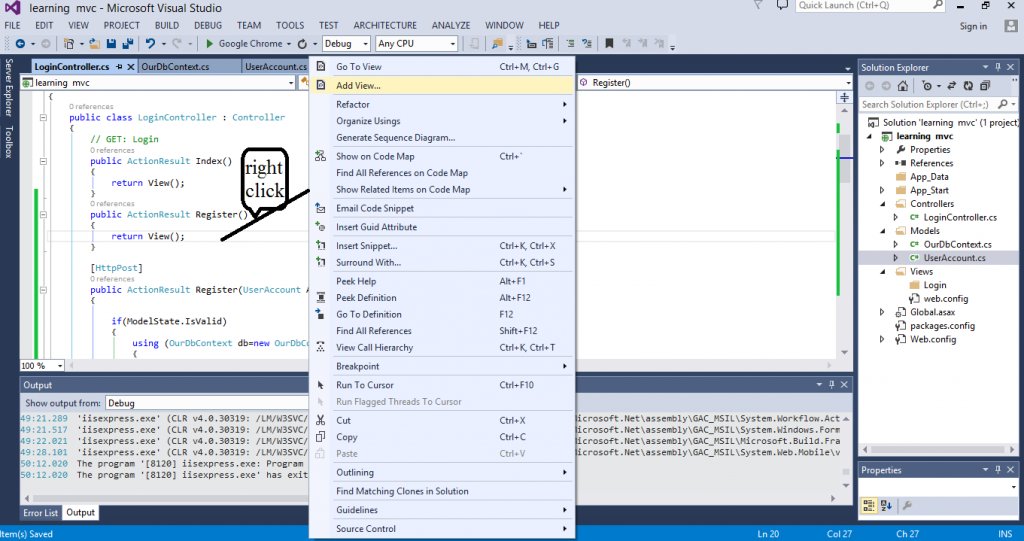
A pop window will appear give the necessary value based on below figure.
Add viewbag message in your Register.cshtml
@model learning__mvc.Models.UserAccount

@{
    ViewBag.Title = "Register";
}

Register


@using (Html.BeginForm())
{
    @Html.AntiForgeryToken()


        UserAccount

        @if (ViewBag.Message != null)
        {

                @ViewBag.Message

        }
        @Html.ValidationSummary(true, "", new { @class = "text-danger" })

            @Html.LabelFor(model => model.FirstName, htmlAttributes: new { @class = "control-label col-md-2" })

                @Html.EditorFor(model => model.FirstName, new { htmlAttributes = new { @class = "form-control" } })
                @Html.ValidationMessageFor(model => model.FirstName, "", new { @class = "text-danger" })


            @Html.LabelFor(model => model.LastName, htmlAttributes: new { @class = "control-label col-md-2" })

                @Html.EditorFor(model => model.LastName, new { htmlAttributes = new { @class = "form-control" } })
                @Html.ValidationMessageFor(model => model.LastName, "", new { @class = "text-danger" })


            @Html.LabelFor(model => model.Email, htmlAttributes: new { @class = "control-label col-md-2" })

                @Html.EditorFor(model => model.Email, new { htmlAttributes = new { @class = "form-control" } })
                @Html.ValidationMessageFor(model => model.Email, "", new { @class = "text-danger" })


            @Html.LabelFor(model => model.Username, htmlAttributes: new { @class = "control-label col-md-2" })

                @Html.EditorFor(model => model.Username, new { htmlAttributes = new { @class = "form-control" } })
                @Html.ValidationMessageFor(model => model.Username, "", new { @class = "text-danger" })


            @Html.LabelFor(model => model.Password, htmlAttributes: new { @class = "control-label col-md-2" })

                @Html.EditorFor(model => model.Password, new { htmlAttributes = new { @class = "form-control" } })
                @Html.ValidationMessageFor(model => model.Password, "", new { @class = "text-danger" })


            @Html.LabelFor(model => model.ConfirmPassword, htmlAttributes: new { @class = "control-label col-md-2" })

                @Html.EditorFor(model => model.ConfirmPassword, new { htmlAttributes = new { @class = "form-control" } })
                @Html.ValidationMessageFor(model => model.ConfirmPassword, "", new { @class = "text-danger" })


}


    @Html.ActionLink("Back to List", "Index")
Add view for login method also.Use same procedure as above.
In the view page of login we only need Username,Password page so remove all other controls.Also Change button name to Login.
@model learning__mvc.Models.UserAccount

@{
    ViewBag.Title = "Login";
}

Login


@using (Html.BeginForm())
{
    @Html.AntiForgeryToken()


        UserAccount

        @Html.ValidationSummary(true, "", new { @class = "text-danger" })


            @Html.LabelFor(model => model.Username, htmlAttributes: new { @class = "control-label col-md-2" })

                @Html.EditorFor(model => model.Username, new { htmlAttributes = new { @class = "form-control" } })
                @Html.ValidationMessageFor(model => model.Username, "", new { @class = "text-danger" })


            @Html.LabelFor(model => model.Password, htmlAttributes: new { @class = "control-label col-md-2" })

                @Html.EditorFor(model => model.Password, new { htmlAttributes = new { @class = "form-control" } })
                @Html.ValidationMessageFor(model => model.Password, "", new { @class = "text-danger" })


}


    @Html.ActionLink("Back to List", "Index")
Create a view for LoggedIn also.But in this view use templates as Empty without model.
Change the view as below.
@{
    ViewBag.Title = "LoggedIn";
}

LoggedIn
@if (Session["UserId"] != null)
{
    @Session["UserName"].ToString()
}
Now you can run your project .
We create a simple login page in MVC frame work

